Saturday 5 January 2013

On the Otago Central trail [4]

Continuing in the vein of the first article but starting from the Cromwell end here are some highlights from the maps so far.
ocm001
Looking at Cromwell again here is the slightly revised layout showing as we can see a small portion (100 metres or so) of the former railway route which is still visible and out of the water. There has been a bit of speculation elsewhere about how to interpret landform shapes around the vicinity of Cromwell station with suggestions the inlet is the turntable pit. I don’t believe any interpretation can be reached, there was probably a shape in the hill because most of the location of Cromwell is now underwater. I believe there is public access to this small length of formation.
ocm003
This is a bit further back up the Gorge. The headland to the left where the rail line curves away from the highway is, I believe, another piece of former rail formation at about 200 metres altitude. It is useful to note here that the gradient profile of the line was not a steady climb uphill. It was quite a sawtooth type of profile which was caused by constructing it closely alongside the road and therefore following the highs and lows of the road profile. Therefore it is possible this close to Cromwell (this location is about 2.5 km from Cromwell and, for further reference, directly opposite the Cairnmuir Slip) to have got a height seven metres higher than Cromwell station. This is also a length of about 100 metres and there appears to be public access with a road going around it. However as yet I don’t have any aerial images (unlike at Cromwell itself) to confirm this was the location of the railway.
ocm030
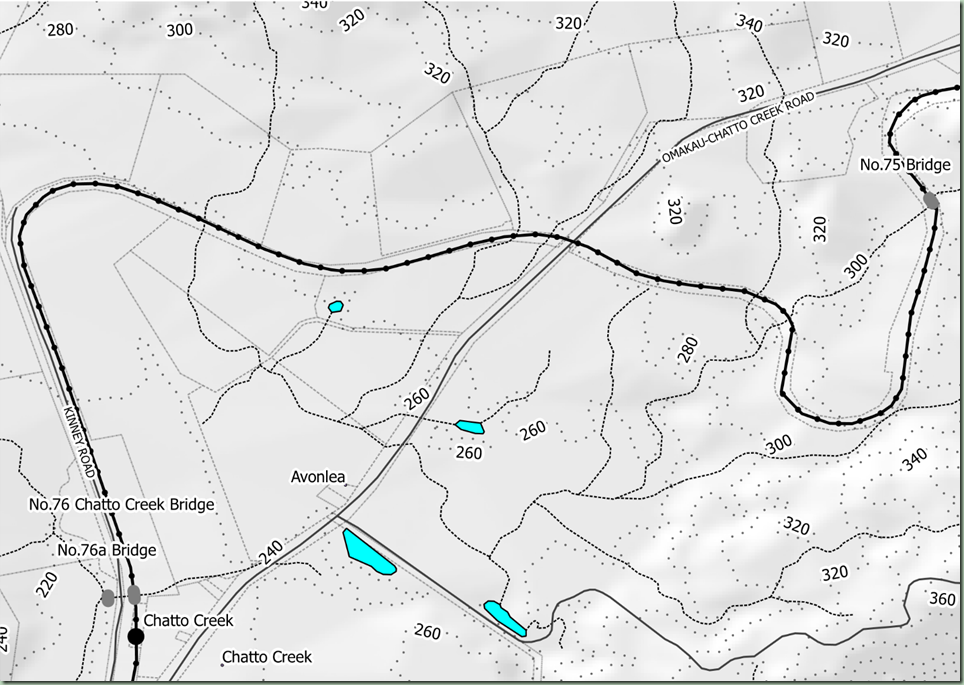
Chatto Creek station is to the west (in railway terms) of Tiger Hill and in steam days, special trains were often worked between Omakau and Chatto Creek to move the tonnage over the hill which was a significant bottleneck, being a long 1 in 50 gradient. The bridge 76a on the left is in the Chatto Creek ballast pit. The actual extent of the bridge or where a siding would have run isn’t really clear to me at this time. Tiger Hill is basically the three large curves you can see although the grade started a little further east, basically the road overbridge No.74a. That bridge was built in the mid 1960s and replaced a level crossing.
ocm035
Omakau was itself a significant station at one point and included an engine shed and turning triangle as shown on this diagram. These are of course long gone but the goods shed still stands although now on private land in what used to be the railway yard.
There are two more pictures I want to include in this post before I wrap up. These are the sites of two possible realignments of the line. Improvements of this nature were rare on any branch line, as they struggled to pay their way. For example the Hyde accident disaster site was at a 180 metre (6 chain) curve, unheard of on a main line except maybe in a yard, but quite acceptable on a branch with its lower speeds. Towards the end of NZR days, the speed limit on the Central was 50 km/h from Wingatui to Kokonga and 40 km/h from there to Clyde. Although, by the time the line closed, most major bridges had speed restrictions of 15 km/h put on them, probably because of deferred maintenance. So the kinds of routine improvements seen on mainlines were virtually unknown on branches. And yet, we have two possible realignments shown below.
ocm037 ocm044
On the left the one we can see there is pretty definitely confirmed by land boundaries, but no more. This is about 1 km east of Omakau. One of the frustrations of GE coverage of this area is heavy cloud cover, but Bing Maps has good views, which confirm that on the ground there is no trace of any previous formation to be found. The curve particularly at the bottom would have had to be outside the normal embankment profile making it possible that it would be levelled by a landowner. On the right, this one is based on actual knowledge that a deviation took place somewhere in this area east of the Poolburn Viaduct. Firstly in Dangerfield & Emerson 3rd edition page 28 we have a reference to an unstable hillside near Poolburn where a small deviation was later required. Secondly, travelling on an excursion train in 1989, in the area, the commentary told us there had been a realignment in the 1950s due to unstable ground. Looking at the GE coverage this appears to be the most likely location for a realignment between there and Auripo (originally called Poolburn).
There was of course a more tangible realignment at Prices Creek and that will be covered in a subsequent post.

Friday 4 January 2013

On the Otago Central trail [3]

I am currently finalising and producing the map images to put into the map document, and like the Main North Line one, it will start from the top rather than the bottom of the line – as this is more like its actual geographic arrangement. Therefore the first image in this posting will be from the Cromwell end. I have made my life a lot easier for publishing the map document by making the map composer view the same size as the map size used in Word, this is 17.5 x 12.5 cm. This means the maps don’t have to be resized into Word, all that has to happen is to change the wrapping to be inline with text and when you paste into Word, it helpfully puts a button to do that to the right of the image automatically. The smaller PDFs import a lot faster than the ones that were full A4 size, too – a few seconds compared to two or three minutes each (I kid you not). I don’t really mind the import delay – if that is what is needed to get a high quality image, so be it.
There are 134 distinct images in the maps document, which amounts to a document size of 72 pages. This is a big document, but it is pretty hard to show the level of detail desirable without that number of maps. The scale is typically 1:3000 but in a few places it will be 1:6000, 1:9000, 1:12000 or 1:15000 as the guideline is to use the smallest possible scale while still showing the level of detail desired. However it is possible that future revisions of the map could make some adjustments to the scale of most of the maps and possibly reduce the number of pages while keeping a reasonable amount of detail. For a comparison with some other maps produced recently: the Main North Line – 72 pages for 350 km which means significantly smaller scale in a lot of maps; Nelson Section – 30 pages on about 110 km, well about half the length and half the pages. The main issue in fact is caused by Qgis’ automatic labelling, dictating most of the maps needed to be at 1:6000. It may be possible to push this out to 1:9000 in future, perhaps with manual placing of captions or adjusting the label size to a smaller font, currently 8 or 9 points. Maps for closed lines will always be at a higher scale because of there being more interest in finer details and it being more difficult to locate the route.

Thursday 3 January 2013

On the Otago Central trail [2]

I have now completed detailing the map and am preparing to generate page views for the map document. For the meantime I am starting with the Cromwell end because of the work I have done here to determine where the line went, this will be published as an interim release of the map as the rest of it will take another day or so to finish. Here for now are the 15 images for the mapping of the Cromwell Gorge, because this is a substantial point of interest with the significant changes due to building the hydro dam and raising the Clutha River through Cromwell Gorge.
It should be noted that the below is an interpretation of maps and GE coverage and the exact route of the railway today is uncertain because of large scale changes in the Cromwell Gorge associated with the hydro development. For this reason the purported rail route is marked as, “Inexact Route”. However just because the highway alignment today is similar to what it was back in 1980 doesn’t mean that the bulk of the rail route is out of the water. There are one or two particular places where this is in fact the case and they are near Cromwell. For the rest of the route, most of it would be under water today, or buried by construction works associated with the dam.
It is generally documented and accepted that the highway was taken further up the side of the gorge and therefore the lower formation of the highway was abandoned with the railway alongside. There has been some speculation, particularly in a TV programme, that this means some rail remains could be found below the waterline. However, Dangerfield & Emerson states “nothing remains west of Clyde” although I believe there are a couple of pieces of formation still out of the water. It is important to note as well that there was large scale contouring of the gorge sides below the waterline in various places throughout the Gorge which was necessary to stabilise numerous landslips that exist throughout the Gorge. These works would have buried or destroyed any remnants of the railway line. I wouldn’t rule out some remains may exist but because of all of the earthmoving work done for the hydro development, which was a lot more than at most hydro sites, a lot will have disappeared.
Earlier in the week I did post in this same article my belief that the highway was simply higher on its existing site. This has proved to be a mistaken view. The railway formation is laterally displaced from the current highway by perhaps 100 metres in some places and at a lower level. Therefore rather than saying it is all buried under the highway, it is more correct to say that it is either underwater or buried under dam construction works. The NZMS1 maps show that the highway in the 1960s appeared similar to the current highway. In retrospect it is very difficult to see a 100 metre difference on a 1:63360 map, which at that scale would be of the order of 2 mm. The highway would appear similar because it still follows similar contours of the land. On the other hand the maps I have drawn are depicted at a scale of 1:6000 and it is possible to show what will be a significant change of location at such a scale. Therefore I am going to redraw the maps in the knowledge that the railway line is significantly displaced but this will not be easy to do, so it will never be more than an approximation.
The original maps with this article are temporarily withdrawn until the new maps have been assembled.

Wednesday 2 January 2013

On the Otago Central trail [1]

Yesterday I started work on the map of the Otago Central Railway and it is progressing well. The OCR is a line we know a lot about because of the research done and books that were published, notably Dangerfield & Emerson, and also because the Department of Conservation has done archaelogical surveys of the bulk of the route which remains in the Rail Trail. Thus the map document will include a full list of stations, and most of the bridges beyond Middlemarch, as well as ballast pits etc. Of course with the benefit of GE or Bing Maps coverage we can also determine fairly accurately where some of these places were as well. There is some of the area that still has only medium GE coverage but those areas are also covered by Bing Maps at a higher resolution. The DOC bridge list includes grid references to the obsolete NZMS260 series maps rather than latitude/longitude coordinates. LINZ have coordinate convertors on their website to turn these grid references into WGS84 latitude/longitudes. So then I was able to check these coordinates in GE. It is good to see that Google has gone back to having visible points when editing paths in the latest edition of GE.
The table list of this data has now been completed and can be seen in the documents uploaded to the website. The maps are being drawn up and this posting will include some points of interest found so far with the maps.
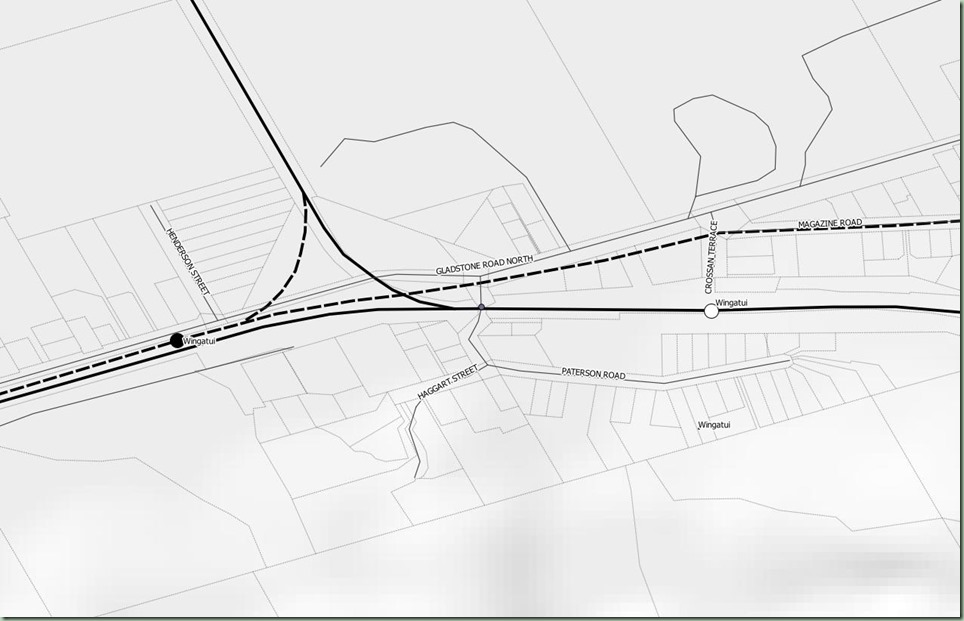
Firstly, Wingatui. We know that the layout was different before the main line from Dunedin was duplicated and upgraded. One part of these works was to build a new double tracked tunnel to the west of the old single tracked tunnel (which is still there incidentally). In part because of this but also for more convenient operation, Wingatui station was moved to be closer to Dunedin.
wingatui
On the old single track route, Wingatui was further west as shown, and originally trains which stopped at Wingatui used to have to reverse to go up the Central with the triangle leg shown. Later on, according to Dangerfield & Emerson, there was a backshunt put alongside the main line closer to the racecourse, and trains for Central would set back from the Wingatui station before going up the leg that faces Dunedin. The duplication works completed in 1914 changed all that by moving Wingatui to the east. Then both tracks would be able to connect to the facing leg (the leg going the other way was apparently lifted with the change in layout). Now the mainline has been singled again, things are a little simplified in the yard. The little dot over Paterson Road is where the overbridge is – I haven’t yet drawn that in. The zero peg for the Taieri Branch is just west of that bridge.
TaieriSidings
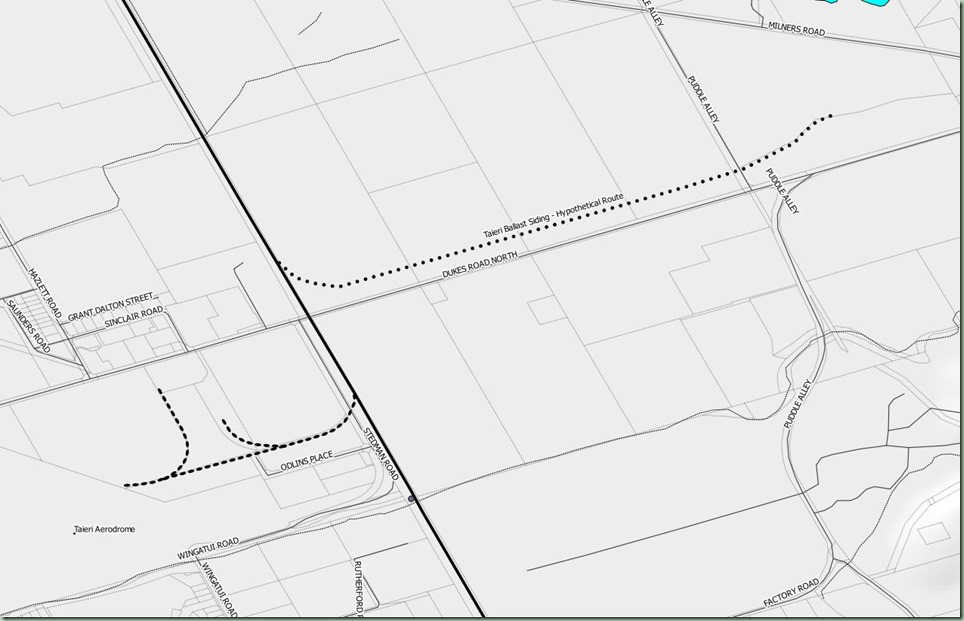
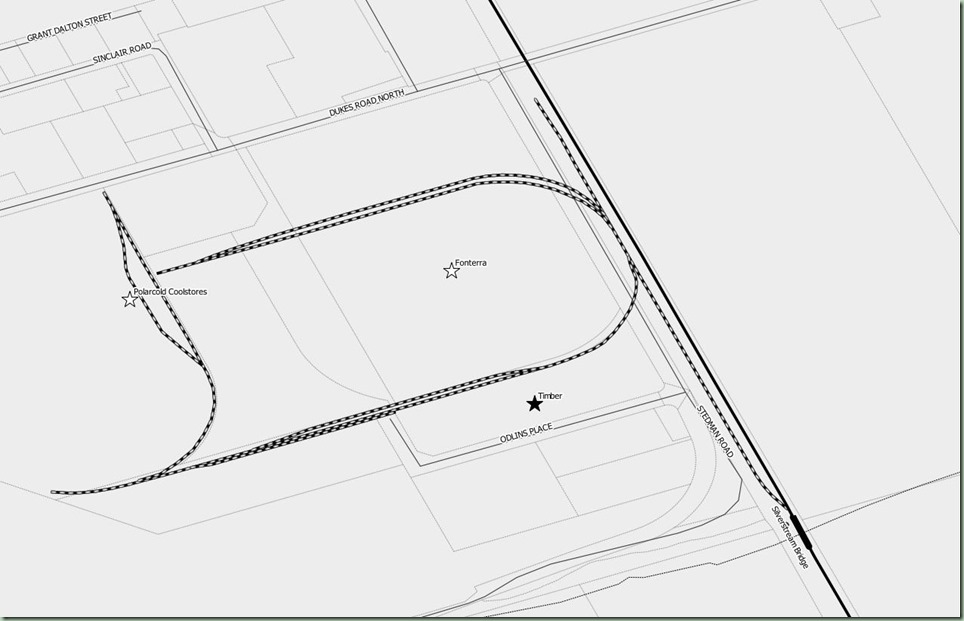
Firstly, at Taieri / Wingatui we have the Taieri Industrial Estate sidings to the left, and on the right we can see a proposed route for the Taieri Ballast Siding. There is not enough documentation about the latter nor any ground evidence today to confirm its route, although we do know where it joined the main line (3.2 km) and where the pit was that it went to. The Taieri Industrial sidings are what was shown in the LDS data layers. These are the siding for Fisher and Paykel to the right, a timber plant at the bottom (I think) and the Silver Fern Farms (ex Fortex) meat processing plant to the left. The layout has been changed quite a lot since the F&P plant was taken over by Fonterra and the current layout is shown below. It also shows a loop on the SFF (now Polarcold Coolstores) siding, which I think has always been there.
TaieriSiding2
As you can see, the Taieri Estate sidings now start with a headshunt just to the north of Silverstream Bridge, and the sidings all go off this. The original siding is the lower curved one and has been extended with an extra loop. The backshunt that used to be used by F&P (it never went inside any building, even though the building layout has been changed by Fonterra) is gone. The biggest change to the site is the two new sidings added at the north side, the backshunt of which goes right up to the boundary with Polarcold.  (Note the above map is a bigger scale than the previous one).
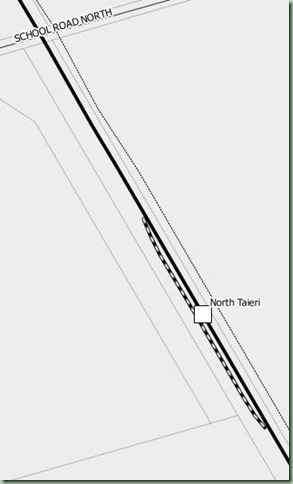
The Taieri Industrial Branch ends just a bit further north at 3.5 km and the Taieri Gorge Railway starts there. At the location they call North Taieri, the TGRL have built a crossing loop for their trains. I presume crossing a train there is cheaper than doing a crossing on Kiwirail’s tracks. The last time I went to Middlemarch on the TGRL which was 3 1/2 years ago, we crossed a train there because it was a busy day with two trains running. So as our train came off the TGRL, we crossed the train going to Pukerangi that day.
ntaieri S5_20090412_263
On the left you can see what North Taieri looks like on the map. On the right is the crossing of our train. Because of the wagons that had been left in the loop, the Pukerangi train had to back out of the loop back on to the main line after our train had passed. North Taieri is roughly at 4.0 km, which puts it a little to the south of the location of North Taieri Tanks, a set of water tanks that were used to top up steam locomotives in the earlier times of the line (closed 1936). The original length of the Taieri Industrial Branch was to have been 4.0 km but the end was moved back to 3.5 km because it was too close to the level crossing, apparently it would have made Kiwirail responsible for the crossing in some measure.
At the moment there is a lot more I could do in terms of looking at where things are or used to be on the OCR. I’m not going to look at everything just now, but definitely will come back to some things at a later date, like where some of the other ballast sidings went – I just picked up the Taieri one from my old Google Earth stuff.